JanusGraph 搭建及简单使用
基本环境
底层数据库基于 HBase,检索服务基于 Elasticserach。
系统运行服务大致如下:
[root@xnode208 ~] jps
21584 GremlinServer
27857 DataNode
23218 Jps
3251 HMaster
27283 NameNode
21707 Console
17131 Elasticsearch
29503 SecondaryNameNode
安装
下载 janusgraph0.22 安装包 并解压
wget https://github.com/JanusGraph/janusgraph/releases/download/v0.2.2/janusgraph-0.2.2-hadoop2.zip
unzip janusgraph-0.2.2-hadoop2.zip
cd janusgraph-0.2.2-hadoop2
配置
在这里我们采用的是启动 gremlin-server 服务时,加载指定配置文件的方法创建图表,所以需要设置 gremlin-server 端以及图表的配置文件。
-
创建 gremlin-server 端配置文件
janusgraph-0.2.2-hadoop2/conf/gremlin-server/socket-gremlin-server.yaml,这里我们复制 gremlin 服务默认的配置文件,在此基础上进行修改cp conf/gremlin-server/gremlin-server.yaml conf/gremlin-server/socket-gremlin-server.yaml -
修改
socket-gremlin-server.yaml:在配置文件中添加 graphManager; 并在 graphs 项中添加 graph 键及其值,一个键值代表一个图表,值表示对图表的设置 (可添加多个图表,每一个图表都有自己的配置文件),如:graphManager: org.janusgraph.graphdb.management.JanusGraphManager graphs: { blablabla, graph: conf/gremlin-server/socket-jg-hbase_fyk-server-configraph.properties } -
准备上述
socket-gremlin-server.yaml中对图表进行设置的 properties 文件,conf/gremlin-server/socket-jg-hbase_fyk-server-configraph.properties文件内容如下:gremlin.graph=org.janusgraph.core.JanusGraphFactory graph.graphname=graph storage.backend=hbase # 设置我们本地启动的 hbase 作为底层数据库 storage.hostname=127.0.0.1 index.search.backend=elasticsearch # 设置 Janus graph 自带的 es 作为我们的检索服务 index.search.hostname=127.0.0.1 cache.db-cache = true cache.db-cache-clean-wait = 20 cache.db-cache-time = 180000 cache.db-cache-size = 0.5
基本用法
依次启动 hbase,elasticsearch 以及 gremlin-server,最后进入 gremlin.sh 客户端对图表进行操作
-
hbase
[root@xnode208 ~] start-hbase.sh -
elasticsearch.(注:Janusgraph 自带的 elastic search 服务启动时为确保安全被禁止使用 root 用户)
[zkr@xnode208 ~] cd /usr/local/janusgraph-0.2.2-hadoop2 [zkr@xnode208 elasticsearch] ./bin/elasticsearch -
gremlin-server(启动成功后,会创建我们在配置文件中设计的图表)
[zkr@xnode208 janusgraph0.2] ./bin/gremlin-server.sh ./conf/gremlin-server/socket-gremlin-server.yaml -
gremlin.sh(进入 gremlin 交互式客户端)
[root@xnode208 janusgraph0.2] ./bin/gremlin.sh
gremlin>
加载诸神图
# 连接 gremlin server
gremlin> :remote connect tinkerpop.server conf/remote.yaml session
==>Configured localhost/127.0.0.1:8182-[f6db862e-752c-48db-839b-1b5b16f1786a]
gremlin> :remote console
==>All scripts will now be sent to Gremlin Server - [localhost/127.0.0.1:8182]-[f6db862e-752c-48db-839b-1b5b16f1786a] - type ':remote console' to return to local mode

# 加载诸神图到我们创建的空图表中
gremlin> GraphOfTheGodsFactory.load(graph)
==>null
示例数据描述了一部分希腊诸神以及他们居住的诸神殿的相关关系。
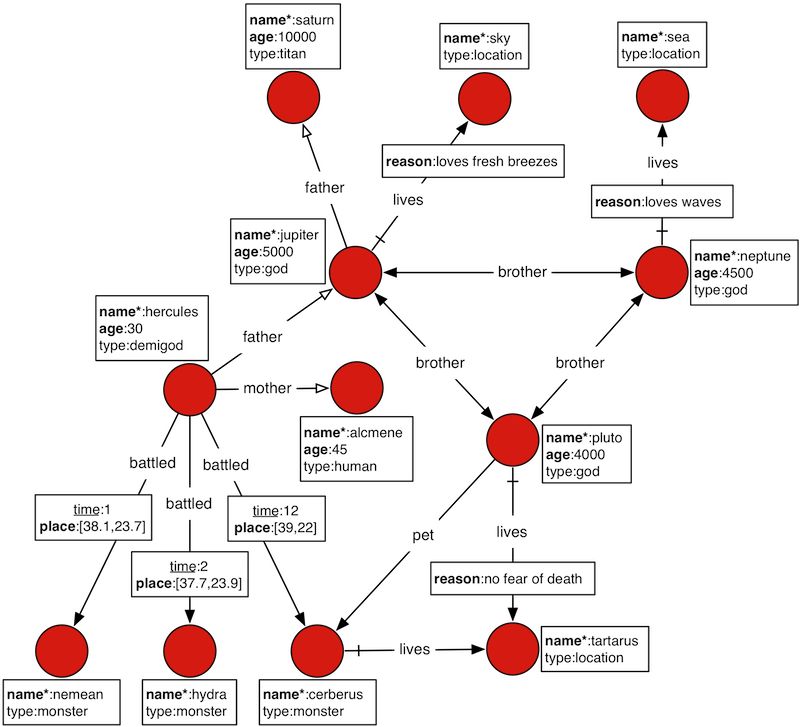
| 符号 | 含义 |
|---|---|
| 粗体键 | 带索引的键 |
| 星标粗体键 | 具有唯一值的带索引的键 |
| 带下划线的键 | 以顶点为核心的带索引的键 |
| 空心箭头边 | 不能有多个指向的唯一边 |
| 尾部划线的边 | 单向边 |
在 JanusGraph 中,实体以顶点表示,关系以边表示,顶点和边都可以具有属性。
一些基本操作
增操作
# 添加顶点
v1 = graph.addVertex(label, 'student');  # 创建第一个顶点 v1 并增加标签
v2 = graph.addVertex();  # 创建第二个顶点没有标签

# 为顶点添加属性
v1.property('id', '1');  # 为顶点 v1 添加 id 属性,值为 1
v3 = graph.addVertex(label,'girl','name','huahua');  # 创建第三个顶点并且增加标签,属性以及属性值
v4 = graph.addVertex(label,'boy','name','wuyanzu','age',18)  # 创建第四个顶点添加标签以及多个属性属性值

# 添加边
t1 = v1.addEdge('friends', v2);  # 为 v1 添加关系到 v2, 并定义这个关系为 t1
t2 = v1.addEdge('boyfriend', v2);  # 两个顶点之间可以增加多种关系

# 为边增加属性
t1.property('reason','cool');  # 为 t1 增加属性
v3.addEdge('boyfriend',v4,'reason','because the reason');  # v3 添加关系到 v4 并且增加关系属性及属性值

# 提交修改
graph.tx().commit();
删操作
# 清空
g.V().drop();  # 删除所有点 / 图
g.E().drop();  # 删除所有边
graph1.close();
JanusGraphFactory.drop(graph1);  # 清空图中的所有数据

# 删除顶点
pluto = g.V().has('name','pluto').next();g.V(pluto).drop().iterate();  # 删除 name 属性为 "pluto" 的顶点
g.V().has('keys','ll').drop().iterate();  # 删除 keys 属性为 "ll" 的顶点
g.V().hasLabel('student').has('name','ll').drop().iterate();  # 删除标签为 student,并且顶点属性 name 的值为 "ll" 的顶点

# 删除边
g.E().has('uuu','because the reason').drop().iterate();  # 删除边属性 uuu 的属性值为 because the reason 的边
g.E().hasLabel('boyfriend').has('event','the reason').drop().iterate();  # 删除边标签为 boyfriend 并且边属性 event 的值为 the reason 的边

# 删除顶点标签以及顶点属性
g.V().hasLabel('girl').drop();  # 删除标签 girl 以及标签为 girl 的所有顶点
g.V().properties('name').drop();  # 删除顶点属性 name

# 删除边标签、边属性以及属性值
g.E().hasLabel('boyfriend').drop();  # 删除边标签 boyfriend
g.E().properties('uuu').drop();  # 删除边属性 uuu
g.E().hasLabel("friend").properties().drop();  # 删除边标签为 friend 的所有属性以及属性值
g.E().values('because the reason').drop();  # 删除边属性值为 because the reason 以及对应的属性


graph.tx().commit();  # 提交
查询
# 设置 g=graph.traversal(), 方便查询
gremlin> g = graph.traversal()
==>graphtraversalsource[standardjanusgraph[hbase:[127.0.0.1]], standard]

# 顶点标签查询
g.V();  # 查看所有顶点 id
g.V().label();  # 查看所有顶点标签
g.V().hasLabel("god");  # 查看所有标签为 god 的顶点 id
g.V().filter(label().is('god'));  # 用 filter 查看所有标签为 god 的顶点 id
g.V().has('name','hercules');  # 查看属性为 name, 值为 hercules 的顶点

# 顶点属性及属性值查询
g.V().valueMap();  # 遍历每个顶点的属性及属性值 (若没有展示空集)
g.V().properties();  # 查看所有顶点的属性及属性值 (不展示空)
g.V().hasLabel("god").values();  # 查看所有顶点标签为 god 的属性值
g.V().hasLabel("god").properties();  # 查看顶点标签为 god 的所有顶点属性以及属性值
g.V().values('id');  # 查看顶点属性为 id 的属性值
g.V().properties('id')  # 查看顶点属性为 id 的属性及属性值

# 边标签查询
g.E();  # 查看所有顶点之间的边 顶点 id---> 边 ---> 顶点 id
g.E().label();  # 查看所有边的标签 (关系)
g.E().hasLabel("battled")  # 查看标签为 battled 的所有边
g.E().filter(label().is('battled'));  # 用 filter 查看标签为 battled 的所有边
g.E().has('time',12);  # 查看属性 time 的值为 12 的所有边

# 边属性及属性值查询
g.E().valueMap();  # 遍历所有边属性及属性值
g.E().properties();  # 查看所有边属性及属性值
g.E().hasLabel("battled").values();  # 查看所有标签为 battled 的边属性值
g.E().hasLabel("battled").properties();  # 查看所有标签为 battled 的边属性以及属性值
g.E().values('reason');  # 查看边属性为 reason 的属性值
g.E().properties('reason');  # 查看边属性为 reason 的属性及属性值